
If your IT ecosystem is, as is the case in most companies, a tower of babel plagued by different applications that speak different languages, this blog is of interest to you!
We have already talked about the problems that occur in most companies when it comes to integrating the different applications in use. In that case, we presented iPaaS (Integration Platform as a Service) solutions and, more specifically, we showed you the 4 key factors for choosing the best iPaaS.
This time, we will go into detail, and we will see, step by step, how to integrate into Oracle Integration Cloud Service, a managed service offered by Oracle in its public cloud that combines the experience gained after years of evolution of its on-premises integration software with the simplicity and ease of use inherent to a PaaS.
There are usually several ways to integrate 2 applications. The most immediate, and the one that has traditionally been used, is the development of ad hoc solutions (either internally developed or from a third party) to carry out a specific integration, which partially solves the problem, since it does not cover the rest of the integrations.
In this regard, the experience we have gained at Neteris through our work with various clients suggests that the ideal approach is to deploy not just an integration, but an integration hub that allows us to centralise all requirements in this area, thereby achieving:
- Standardisation
- Optimization
- Reduced operating costs
- Economies of scale
- Centralisation, analytical capabilities and capacity for improvement
Download our Online Session
Keys to process optimization and system integration in 2026
An event to address business integration challenges, with real cases
How to build an ORACLE OIC Integration?
Well, having understood the importance of having an integration HUB in your company, we will now show you, with an example of a fictitious client, the ease of use I was talking about previously:
1. Choosing the starting point of the integration
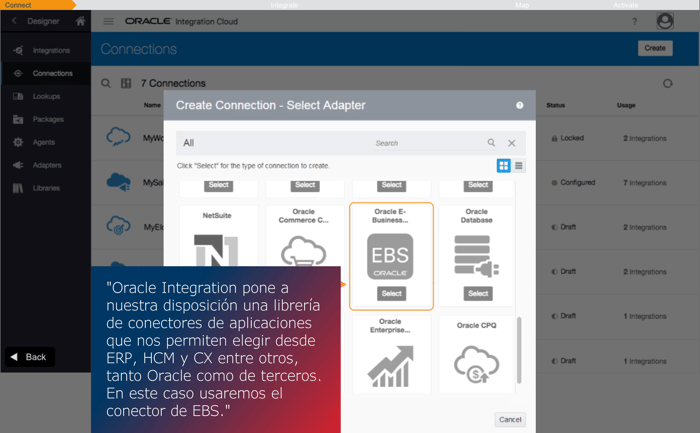
At this stage, we will select the application we wish to connect to and, accordingly, choose the appropriate connector (from among the more than 70 adapters available on the platform). We will need to provide the URL and login credentials for the platform in question (Oracle EBS in this case), thereby creating one end of the integration.
2. Selecting the other end of the connection
We will repeat the previous step, selecting the other end of the integration – that is, the other application to be connected to the one we selected earlier.
It is important to understand that, as this is an integration hub, we can create as many connections as we like, so we can repeat this step for every application we wish to connect via Oracle Integration Cloud.
3. Setting up the integration
In the image below, we can see that, once we have configured the connectors to our applications, we need to proceed to create the integrations:
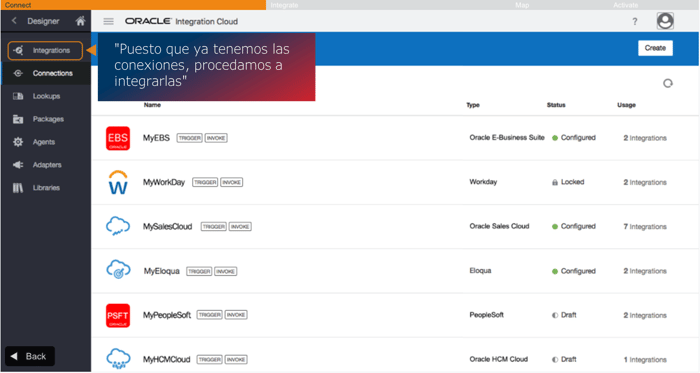
When accessing the integrations menu, we need to choose how we want that integration to take place. Among other options, we can choose to initiate the process upon receiving a notification via an API or when an event occurs in an application, or even on a scheduled basis to meet the integration requirements associated with batch processes.
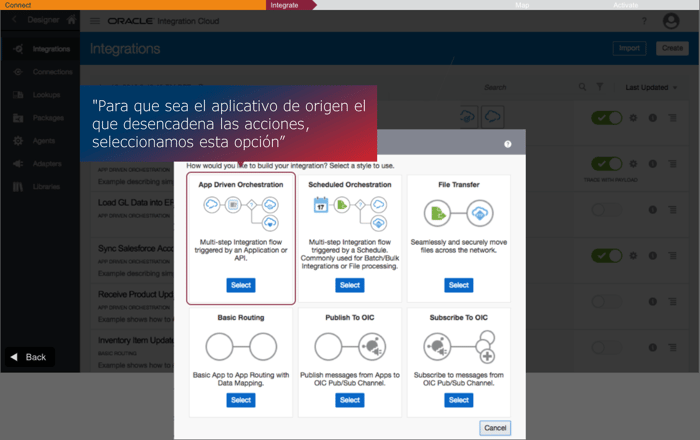
In this case, by way of example, we want to synchronise orders between an on-premises ERP and a cloud-based ERP.
Depending on the source application – and given that the connector has been designed with its functionalities in mind – we will be presented with a range of options.
In this case, the trigger will be an update to the status of an order, as shown below:
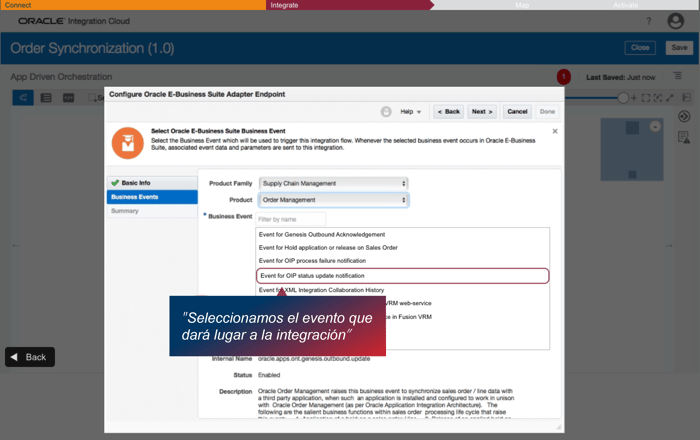
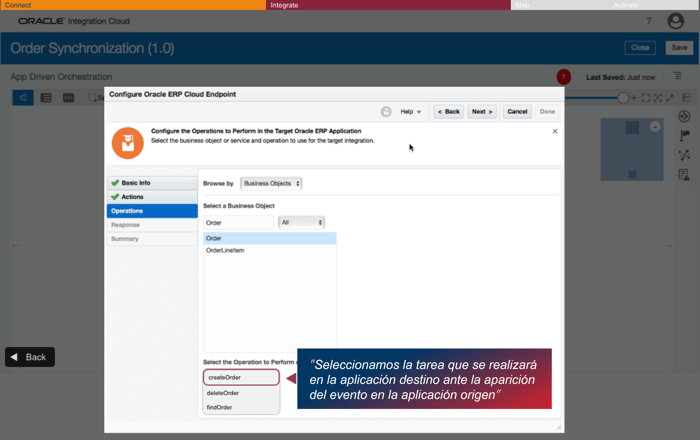
Once the endpoint that triggers the integration has been configured, we need to set out what is going to happen – in other words, what the other endpoint needs to do in response.
In this case, a new order will be created, with both ERPs synchronised.
4. Mapping of information
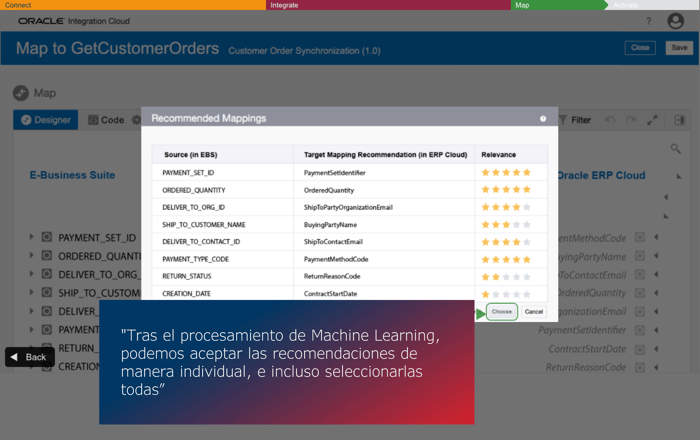
Once the integration has been built, it is vital importance to ensure that there is a correct mapping of the information, i.e., that the master data fields sent by the endpoint that originates the integration are correctly mapped to the schema of the destination. It is necessary to understand that, for example, the customer name at the source may be in the “Customer Name” field while at the destination it may be in the “Customer” field.
Graphically, as can be seen in the editor, it is shown as follows:
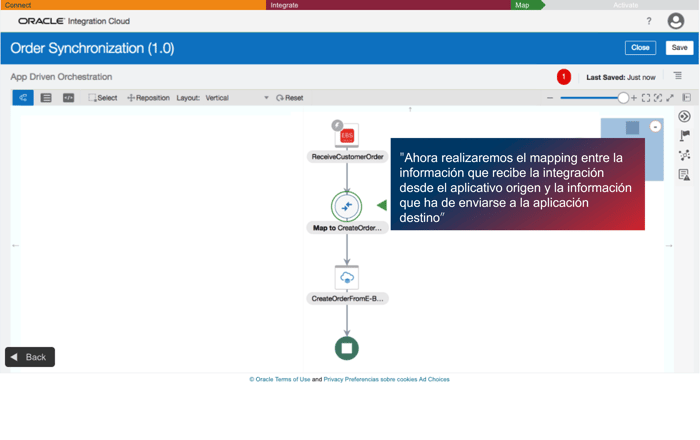
At this stage, we can carry out a manual mapping (the tool allows us to drag and drop the source fields onto the destination fields), although we also have the option of using the mappings recommended by the tool following the application of Artificial Intelligence and machine learning algorithms.
The final step is to activate the integration and check that we have done it correctly.
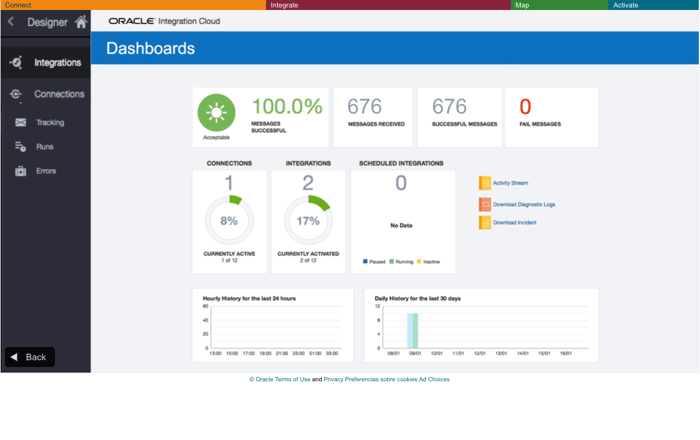
To this end, Oracle Integration provides a dashboard that allows us to monitor the integration: